HIL COOK MAKEUP, HAIR and PROSTHETIC ARTIST

HIL COOK MAKEUP, HAIR  and PROSTHETIC ARTIST
Join Hil and her savvy team on their journey behind the scenes in the world on makeup and hair. Mobile on the go EVERYWHERE!

Choosing the right makeup brushes


HAIR TYPEMakeup brush hair type is THE most important factor when choosing your makeup brush. The best and the choice of professional makeup artists is natural hair type. The hair quality affects the prices of makeup brushes and ranges from the finest and most expensive Kolinsky sable to the most common natural bristle. Kolinsky sablesquirrelmink and weasel are used in top quality brushes. 
 Note: Famous brand names DOES NOT ALWAYS EQUAL higher quality. Decent quality choices include Goat, Pony and hair blends. Synthetics such as Nylon and Taklon, are best left for use on eyebrows and for applying foundations, respectively.
CUT: This refers to the method by which the hair is harvested. It makes a huge difference because virgin, first-cut fur makes the softest makeup brush and can make not-so-high ‘grade’ hair types cosmetic brushes feel as soft as possible for that particular hair type. First-cut (Top grade) hair, is also cruelty-free, as they are sheared from the tips of the fur. That is why they are the softest on your skin. The best way to relate I guess, is to imagine how the tips of our own hair would feel after a hair cut. Blunt-cut hair refers to the ‘lower’ cut of the fur. They are much coarser and can feel prickly against your skin. Imagine brushing cropped prickly hair against your face…OUCH! Blunt-cuts are widely used in lower quality cosmetic brushes because they are much cheaper than the first cut. Of course, this information is rarely provided but a good way to test is to look at the tips of the hair of the makeup brush. The finely pointed (natural-looking) ones are most likely the first-cut.
MAKEUP BRUSH SHAPE AND DENSITY: The shape and density determine whether they will perform the job intended, effectively and efficiently. You want the makeup brushes to do magic and do it fast!
In general, there are three kinds of makeup brush shape – square cutchisel cut, and round cut. No, we’re not talking about diamonds here! :) When we talk about makeup brush shape we’re referring to the shape of the tips of the cosmetic brushes. High quality brushes are hand made, not machine cut, as hand shaped makeup brushes have their precious tips (first-cut) still intact. The machine cannot compete with the skillful hands of the ‘masters’.  Why not? Well, that’s because machines can’t ‘shape’ the makeup brushes without sacrificing (trimming) the soft tips of the makeup brushes. That is why, high quality makeup brushes are hand made hence are usually more expensive but A’SQUIRREL makeup brushes are hand made too but are not at all expensive! 
2. Ferrule (Metal part) 
Check that it is seamless. That means, exactly that – no seams around it! Most makeup brushes are seamless. Metal types used include Aluminum (usually Aluminium Alloy as Aluminum by itself is impossibly soft), Copper and Brass(strongest). Whatever the metal type, ensure they are double crimped (2 circles around them) to avoid wobbly handles.
3. Handle 
Check that it is made from hard wood and that the length or overall weight feels good in your hand. The length of the handle is a matter of personal choice but usually most prefer around 7” or thereabouts. 

Another couple of gorgeous Bridal parties

Thought I would share some more pics of our latest bridal parties
 
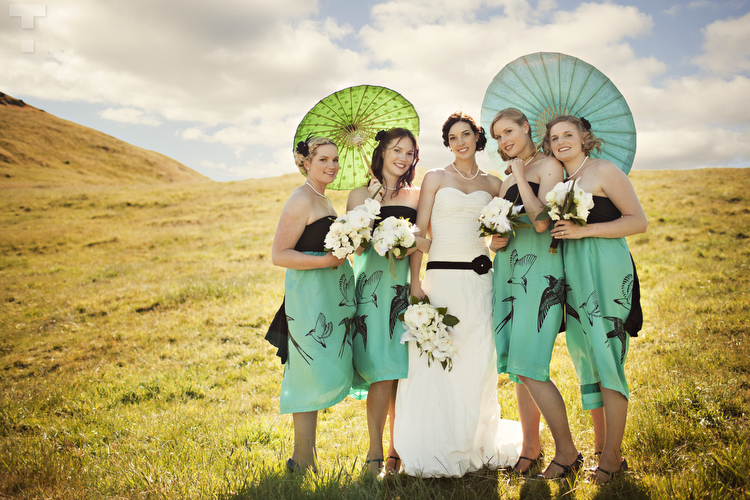
Stunning Janine & her bridal party.  Hair & makeup by Hil Cook & Ange Duncan


Then the lovely Sarah and her wedding party
Sarahs Mum made all the bridal dresses. Very clever lady!
Gorgeous Victorian styled dress for Sarah made by her clever mum.


As you can see its been a busy week :)

Hils x

Contouring for your face shape


CONTOURING THE SHAPE OF YOUR FACE.
HOW TO SHAPE AND REDEFINE YOUR FACE?
Contouring is the oldest technique in makeup and a great makeup artist's secret tool. Not many women know about it and the technique is advanced. So handle with care so you don't end up looking overdone. The key is less is more. Your makeup should be simple and natural. It's your face we want to notice not the make up.

When you contour you will change, accentuate, hide, strengthen and define your face


Think of contouring as painting a blank canvas. You apply foundation to even out your complexion. Then think of creating shape to your face.
The main principle is this:
   Dark shading will make facial features recede
   Light shading will make facial features more prominent

   Thin down a rounded face


   Soften a square face


   Define your cheek bones 


   Narrow a large or wide shape nose


   Define your jawline


   Create fuller lips


   Lift saggy eyes


   Minimize a large forehead or receding hair line


   Make your eyes look bigger


TO SCULPT YOUR FACE YOU WILL NEED:
  
   Your true foundation color that matches your skin exactly


   Your contour color that should be 2 shades darker than your foundation and with the same undertone


   Your highlighting color that should be 1 to 2 shades lighter than your foundation and with the same undertone


APPLY AND BLEND, BLEND, BLEND


Over the next few weeks, I will add a new face shape so you can try out the techniques that work for your shape.
Be great to see any photos of what any of you have tried. Email them to hil@hilcook.co.nz and we can post them on our blog.


Cheers Hils x


Love your work!

Subject: Love your work!
Hil & Ange,

Thank-you SO much for preparing me and the girls for my wedding - make sure you check out some of Travis' photos below.

Halina x

Gorgeous bride Halina and stunning bridal party, all wearing Voon. Hair and makeup by Hil Cook & Ange Duncan


Ange Duncan, Halina and Hil Cook. ( Sadly we look a little worse for wear than the gorgeous bride!)

This was Such a beautiful wedding and Halina looked just amazing!  Ange and I look a little tired as we had been to the awards the night before ( Winning best new business) but still managed to be on our brides doorstep at 6.45 to turn the large wedding party into Goddesses.

Thanks for the photos Halina
Hils x

New photos of an amazing Indian engagement.

This is the lovely Visha, she wanted a really exotic Parisian / Bollywood look for  her engagement


Airbrushed and bold exotic coloured eyes
Visha's hair is only just past her shoulders so it took 1.5 hours to stitch in human extension wefts, then curled them.
Thanks for the Pictures Visha :)

Hils  x

New Year has arrived. Time to toss out the old makeup

I’m a stickler for expiration dates. So much so that I find myself tossing things like bread and milk (if the hubbies not around) days before their numbers have been called. (Have you ever caught a whiff of old milk? Gross!) Just like those refrigerator staples, your beauty bag staples can take a turn for the trashcan. Everything from foundation, to powder, to pencils. Not only can they change in color, consistency, and smell, they can become loaded with bacteria. You know what that means…you’ll be on zit patrol! Short of a crushed or crumbled product, it’s tough to know when it’s time to part ways.


Alright, let’s talk about the basics! When should we toss “powdery” things like bronzer, shadow and blush?
A key indication that it is time to toss “powdery” things like your bronzer, eye shadow and blush is when you notice that you’re not getting the desired amount of product on your brushes and it is very difficult to apply them. Another key indication that it’s time to replace them is when you notice that they have turned dark in color.

How about “liquid” cosmetics, like foundation, cream blush or facial lotion?
I find that any liquid or cream make up tends to either dry up, or starts to change in its consistency (sometimes curdles). Always play it safe when it comes to applying your skin care products and makeup. Use the proper brushes and applicators. Try not to use your fingers in your facial creams, liquid makeup, cream blushes and eye shadows to prevent any bacteria from getting into your products.
What about pencils, like lip liner and eyeliner?
When it comes to lip liner and eyeliner pencils, you will know when it’s time to replace them because they tend to dry out and make application very difficult. These products usually have a long shelf life, so to see if they are really “old,” try your makeup pencil sharpener and get to a fresh part of the pencil. This should be achieved relatively quickly with a few twists of the sharpener. If not, then it is a clear indication that they have dried out and it’s time to replace them.
TIP: Gel liners can get a little more life squeezed out of them by adding a few drops of oil when they start to dry up, give a little stir and your good to go.

When is it time to ditch mascara and lip gloss/lipstick?
There is nothing like going to apply your favorite lipsticks or lip glosses and finding them all dried out. This will have us running to replace them! Otherwise, if you are using and cleaning your lip products on a regular basis, there should be no problem. I recommend cleaning them once a week at most. Take a little bit of toner on a tissue and gently wipe your lipgloss and lipstick applicators. I find that replenishing your mascara every 3 months will ensure that it does not dry out and clump.
How do you know when it’s time to throw out makeup brushes?
It is time to replace your old makeup brushes when you notice that the hair from your brushes is shedding when applying your face powder, blushes and eye shadows. This is a clear indication that they are showing their age. This is not normal wear and tear if it’s happening on a regular basis.
Speaking of makeup brushes, what’s the best way to clean them?
I find the best way to clean your make up brushes safely is to use baby shampoo. Put just a dime size drop in a jar, fill with lukewarm water, place your brushes in and swish them around for a second. Let them soak for 10 minutes and rinse them under cool tap water one by one. Wring out the excess water from each makeup brush and place them all on a clean, dry paper towel to dry over night. In the morning, they will be as good as new. Just fluff them up a bit on the back of your hand before using to bring them back to their normal feel.  Cleaning lip brushes, add a little drop on Olive oil on a wet wipe and wipe your brush back and forth until all colour is out. Then shampoo as above.

What’s the best way to clean your actual makeup bag?
This depends on what your current make up bag is made out of. I always have a breathable, cotton one myself. It’s not only better for your makeup to be carried around in, but it also makes cleaning a breeze. I just throw it in the washing machine and the dryer. Any plastic makeup bags can be wiped down with a damp paper towel. Use a little baby shampoo, rinse clean and leave to dry over night.

Try a cocktail party look to see the New Year in.

What makes a great New years eve party makeup? Each woman has her own definition of evening glamour, but the consensus says there's something alluring about glossy lips, smoky eyes (the little black dress of makeup) and softly dewy skin. Cocktail parties are a chance for you to experiment with colorful evening makeup looks that brings out your best side. Herein, a few cocktail party makeup ideas to get you started for seeing the New Year in...

"Cocktail party makeup necessitates cocktail party hair. Try an elegant ponytail to turn heads", or a few random curls for that instant party girl glamour.

Come sunset, it's impossible to go wrong with liquid shimmer. Mix a dab with your foundation for radiant, party-perfect skin. Create a base for the eyes by applying concealer with a slim concealer brush, which is a must for getting into the corners of the eye to camouflage dark circles. Dab the color where your skin is most discolored, then use a finger to pat it in lightly. In lieu of an eyeshadow base, you can use the same concealer brush to pat powder onto the eyelids to give your shadow staying power.

For dramatic cocktail party eye makeup, create smokiness by smudging pewter or gunmetal eyeshadow all the in your crease. This look is less harsh than black but equally dramatic, and the color is one shade fits all (it's especially flattering on blue eyes). If you have green or brown eyes, consider swapping pewter for a plum-based shadow as shown here.

To score lush party fringe lashes, apply your mascara with a fan brush, which works especially well on hard-to-catch lower lashes. Swipe your mascara wand with the fan brush to transfer the color and use it to paint your lashes for an extra fluttery effect. Wipe the fan brush clean with a baby wipe or wash it with your regular shampoo to keep it clean.
You could also try false party lashes for that extra fluttery look,  these can be found in any 2 dollar shop and make a dramatic finish to your party look.  If a full set feels too much, cut them in half or even thirds and just attach to the outer corners of your eyes giving you the wide eyed party look.

cocktail_party_makeup_ideas


Lastly, every girl needs her party gloss and shimmer dust.  Bobbie brown has the best Shimmer bricks in every shade which are just perfect for that party look.  Shimmer your skin for an alluring hydrated look, your cheeks for definition, cupids bow for the party pout and inner corners of your eyes for that eye popping effect that will have men in a trance!

Dust off that little black dress and go party girl!

HAPPY NEW YEAR TO ALL OUR READERS !

Hils x


The teams lovely work this weekend


Our team was pretty busy over the weekend with brides so I just thought I would share with you some of our work.
Lea got the gorgeous Natalia and her flower girl ready in hair and makeup at her place in Wellington.
See photos below

hair and makeup by Lea


Add caption

Beautiful hair work by Lea


Ange and I went to Raumati South to get beautiful bride Anna Head and her bridal party ready in hair and makeup.  Anna had Ruth pretty catering for her reception and the menu sounded out of this world, anyone looking for catering should check out Ruth Pretty catering
Photos below

Hair and makeup by Hil Cook


hair and makeup by Ange Duncan


We had our other artist Nat who got to have the day off as it was her birthday, Nat spent the day preening herself for the evenings celebrations and were joined by the rest of the team once our brides were off up the iles to meet their future husbands.
Hils x

Party Season- try out some party tricks with your makeup

Party season is upon us, which for some means a whirlwind of parties and events. Here are a few make up tips to ensure that you get through summer looking like the diva we know you are.
The most important thing is your skin. It’s a canvas for your make up, if you choose to wear any. Get some great tips on how to achieve glowing skin in our blog

Eye liner:
When you’re getting all dolled up for a night of clubbing it’s better to go with bold eyeliner looks. A daytime liner will seem to disappear at night and your eyes won’t command much attention. Night time is when you can break out the black eyeliner and any other bold and beautiful color for that matter. Try something a little different, the world is your oyster.


Bold Eyes:
A great way to really enhance the look of night time eyeshadow is to moisten your brush with a wet wipe and then dip it into a bold shade of eye shadow colour, this makes the color bolder again, and gives it a heap of staying power. Use another brush (but dry this time) to blend the edges.  Line the lower lash line to frame your eyes and add more of a sultry, smoldering look to your gaze. Don’t be afraid to experiment with using two or three different colors of shadow on the lid and or underneath the bottom lash lines, the more creative the better!


Lashes:
Your eyelashes are very important to the overall look of your face because they frame your eyes, make them look bigger and draw more attention to them. If you  aren’t blessed with mile long eyelashes here are some tips to play up one your most striking features with a little “help”... Single flared lashes, these are applied individually and usually only 3-4 are needed on each outer corner of the eye, va va voom, you will not know yourself!  Mac have some great full lash sets but to be honest, we get most of our full set lashes that grace the pages of fashion mags from the $2 shop.
If its Lash extensions your after, give Lush lashes a call, they last approx 5 weeks and I LOVE them!

Lashes:


When you apply your mascara start at the base of your lashes. As you move the wand up, wiggle it from side to side to get the most coverage. Use an eyelash comb to separate lashes and remove any clumps of mascara. Use a combination of lengthening and thickening mascara to give your lashes the biggest boost. For everyday wear, brown and black mascaras get the job done nicely. Experiment with colored mascara to make your eyes pop and compliment your eye color and liner.

Apply mascara to the top and bottom lashes for a very wide eyed look. Only do the top set for a polished and sophisticated doe eyed look.
For the best coverage, hold the mascara wand vertically and swipe it back and forth across the bottom lashes.  Try to prevent smudging and smearing the mascara on the rest of your makeup but if a wee accident happens, reach for Hil Cook Solution buds. For luscious lashes apply up to three coats of mascara or even give tube mascara a try,  L'Oreal does a great tube mascara at a reasonable price.


Lips:
If you’ve gone super glam on the eyes, pick a demure colour. If you haven’t braved the multi coloured eyes how about going for a vavavoom red colour on your lips.

Lastly, have fun, play around, experiment with colours and textures on your skin.

We made it to the MOON! Thanks Google :)

Click the caption and check out the amazing  personal video that google sent the Hil Cook team for Christmas!Hils x

Check this AMAZING personal video sent to me by Google!

Wow this is the most EPIC personal video, sent to me from Gooogle Adwordsfor Christmas. I am totally blown away !!!!

http://www.youtube.com/adwords10?hl=en-us&forcelang=false&x=0dcc58dbbc5841338a6ee44d0519621f

Mr Celebrity X reveled - Stephen Fleming hosts a fabulous 1920s party with his lovely wife

Well here is people, the big reveal...  Stephen Fleming and his wife, kindly said they would allow us to put their pics on our blog after Ange and I made them up for their 1920's party at their gorgeous home. Check out below.
The mo was knotted by Ange that afternoon out of Yac hair and looked very authentic.


Hils x

Stunning reference for our lovely artist Lea

Hi Lea

Thank you so much for making me look stunning for my wedding day!  You made the experience relaxed and fun and special.  I can tell that you love what you do for a job.  I appreciate the attention to detail and also the fact that you stayed to make sure I looked my best in my dress and that everything was just as it should be before I headed off out the door.  

I left like a beautiful version of myself when I left my parents house to go and marry my man.  The hair and makeup was perfect and you ensured that it complemented my-not-so-traditional dress - and you brought together a complete look for me.  I was completely delighted.  Also, the hair and makeup felt really natural - and it was easy to wear and made me feel so confident on the day!   Even at the end of the night after lots of dancing and wine - the hair and makeup looked fresh and perfect.

My Mum's makeup was beautiful too and I know she had lots of lovely comments on Saturday.

When we get the professional photos through I'll send you through a few pics!  Meantime I have attached a couple of guest taken pics - just so you can see how handsome my new husband looked given you heard a lot about him!

Thanks again Lea.  I won't hesitate recommending you to others and I only wish I had a ball or some amazing event to go to so I could get you back to do my makeup!

Thank you for being part of the day - it was fun having you with us for the morning.

Lucy and her new Hubby
Lucyxx  

How to create a 1920's look

We have just been booked by a Kiwi celebrity to make him and his lovely wife step into the Flapper world of the 20's tomorrow night.  They are hosting a fabulous party and want to look just the part, Celebrity X knew just the team to do it!
Mr Celebrity X will be wearing a pencil thin mustache lovingly knotted up by Ange today and having the true 20s slick hair style. Mrs Celebrity X will be having the whole works yay, what fun.

I thought I would share with you, how to create a 1920s look for anyone one else interested in vintage makeups and hair.


In the "Roaring Twenties," short, bobbed hair, heavily lined eyes and tiny dark lips were an indication that a woman was modern and liberated. Whether you are attending a costume party or you wish to modernize the look as your own, there are ways to make the 1920s face yours.

Difficulty: Moderate
Instructions
Things You'll Need:
         Pancake or cream foundation
         Makeup sponge
         Dark eyebrow pencil
         Eye makeup primer
         Gray/brown-based eyeshadow ( matt tones)
         Black kohl eyeliner or gel liner
         Black mascara
         Lashes
         Blush with touches of red in it
         Waxy dark-red lip liner and lipstick thats matt
1
Apply a foundation in your skin tone that gives your complexion a creamy, perfect look. If your skin is naturally porcelain- or alabaster-toned, play it up.
2
Darken and turn your eyebrows slightly downward with an eyebrow pencil or eyeliner that is darker than your brow color. This works best if your brows are on the thin side. If not, cover your brows with a 1920s-style hat or with fringe chopped straight across as part of a bob cut.
3
Smooth on your usual eye makeup primer, then apply a dark grey/brown-based eyeshadow from lash line to crease.
4
Use a black kohl eyeliner on both top and bottom lash lines.
5
Color your top and bottom lashes with blackest black mascara.
6
Rub blush into the apples of your cheeks, and blend away the hard edges. Make sure the color is still evident, as though you just walked in from the cold.
7
Apply pale pancake foundation or concealer over clean and exfoliated lips. With a waxy dark-red lip liner, exaggerate the cupid's bow on your top lip. Draw your lower lip as slightly plumper than it really is by extending slightly on the bottom. Draw both upper and bottom lips as shorter on the sides.

8
Fill the new lip shape in with pencil before layering matching lipstick over it. When you are through, your lips should not be as wide as they really are, giving the illusion that you have them puckered and ready for a kiss.
9.If you are going to go the whole hog right down to nails, they were painted leaving the half moon and tip out.  Paint in between with a deep dark red.


And there you have it, just like you have stepped out of the 20's,  I will let you know how it goes :)
Hils x


Fun eye makeups to try

Changing your eye makeup can change your overall look dramatically, and there is no shortage of fabulous eye makeup products to experiment with! Try one of these fun ideas to change up your look:
  • A glamorous cat eye look is both sexy and polished. It's sweeping eyeliner really draws attention to the eye and makes eyes appear larger.
  • Bright eye makeup is a hot trend, and one that is easier for most women to pull off than they think. Try a bright shade, such as turquoise or yellow, on your upper lid, and keep the rest of your makeup fresh and bright -- but on the natural side -- to balance the eyes.
  • For a fun, funky eye makeup look, try using two different eye makeup colors on the top an bottom of the eye.
  • Spice up a smoky eye in a fresh new way with the addition of a metallic of shimmer eyeliner. Or, use a colored shadow for your smoky eye look, such as blue or purple, instead of the standard black or grey.
Fun purple smokey eyes to try instead of the standard charcoals 

Rave review from Kathleen (Bridesmaid for Kerrin Eckersly)

Hey Hil & Ange

I just wanted to send a quick note to say a big thank you for all of your hard work on Kerrin's wedding day.   Not only did you make us all look amazing but you were so friendly and easy to get along with, it really added to the days enjoyment.
Ange, thanks so much for helping do up Kerrin's dress, as you may have sensed I was having a few issues getting help with that and you were a life saver. 
All the best with Janine's wedding this weekend, I can't wait to see some photos of how she, Hiria and Rowan look.
Take care and if ever I hear of someone in need of makeup or hair in Wellington I will send them your way.

Kind wishes
Kathleen 

Winner of HER Regional Businesswoman of the Year awards for 2010. Best new business

 'Silent gratitude isn't much use to anyone.' and I agree.

I want to shout my thanks out loud. I want everyone to know and hear how much the support of Ange, Lea & Nat means to me. But more than that, I want them to know. 

Ange you are there for me 200%. You share your support, friendship, passion,expertise and your time unstintingly and I am eternally grateful. without your time and energy, we would not have this business.  Our days tend to be frantic- always rushing around, I so appreciate the time and the extra mile you take to make our business be what it is!!

Lea and Nat, I thank you from the bottom of my heart for believing in our team and going the extra mile for us, even when i cant pay you!
Thanks girls for being amazing artists, for being my friends. Thanks for being there for me and thanks for caring about me. Thanks for everything you do for me.... 
You don't need to, but I am glad you do :)


I going to quote something Mother Teresa  once said in an Easter service I went to in Calcutta...


We cannot do great things on this Earth,
Only small things with great love.

Thanks for making a difference girls !
Hils x

Lea, Ange, Hil, Nat

Our beautiful bride Ann and her stunning bridesmaids.

Hair and makeup by Hil Cook and Leanne Hoare